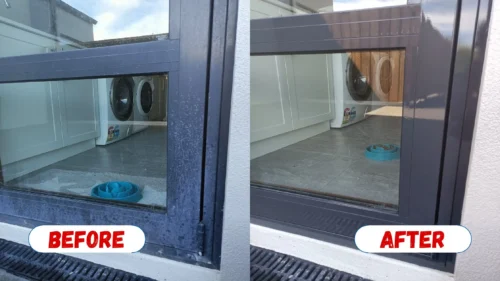
Eliminando puertas corredizas de vidrio Puede parecer una gran tarea, pero a veces es la única manera de hacer las cosas, ya sea que estés mover muebles grandes, Reemplazar un panel roto, o actualizar a uno más modelo de eficiencia energética. Estas puertas pueden ocupar mucho espacio y desgastarse con el tiempo, lo que hace que sea necesario quitarlas por cuestiones de funcionalidad y estilo.

¿La buena noticia? Con el herramientas adecuadas, Con un poco de paciencia y un plan sólido, esto puede ser un éxito. Proyecto fácil de hacer. Dicho esto, la seguridad es fundamental. Estos paneles son más pesados (y frágiles) de lo que parecen, por lo que conviene aprender los pasos adecuados para evitar accidentes y daños. Esta guía le explicará todo lo necesario para realizar el trabajo de forma segura y eficiente.
Razones para quitar una puerta corrediza de vidrio

#Move voluminoso muebles o electrodomésticos con facilidad
#Accesar y reemplazar rodillos o herrajes dañados
#Casa completa renovaciones o mejoras
#Swap out puertas viejas o rotas
#Boost aislamiento y mejorar en general eficiencia de la puerta
Herramientas y materiales necesarios

Destornilladores de punta plana y de estrella – para tornillos y ajustes
Cuchillo multiusos – para cortar masilla o cinta de acristalamiento
Palanca o espátula – ayuda a levantar paneles fijos de forma segura
Guantes y gafas de seguridad – proteger las manos y los ojos
Láminas de espuma o manta gruesa – paneles de vidrio acolchados
Ventosa (opcional) – para un mejor agarre al vidrio
Taladro y broca – para quitar los tornillos del panel fijo
Removedor de sellador – suaviza los selladores para facilitar su eliminación
Cinta métrica – útil si planeas reinstalar
Paso a paso: Cómo quitar una puerta corrediza de vidrio
Quitar una puerta corrediza de vidrio puede parecer complicado, pero con el enfoque correcto, es un proyecto de bricolaje seguro y factible.
Simplemente siga estos pasos cuidadosamente y tómese su tiempo, especialmente al manipular piezas pesadas o frágiles.
1. Limpiar el área

Mueva los muebles, las cortinas y la decoración cercanos. Coloque sábanas o mantas de espuma en el suelo para proteger tanto el cristal como el suelo.
2. Retire la puerta mosquitera (si está presente)

Levante suavemente la pantalla de su riel inferior usando un destornillador de punta plana y déjalo a un lado.
3. Ajuste los rodillos

Localizar el tornillos de ajuste del rodillo cerca de la parte inferior del panel deslizante. Gírelos dextrorso para levantar los rodillos—esto ayuda a liberar la puerta del riel.
4. Retire el panel de la puerta corrediza

Deslice la puerta para abrirla, Levántalo hasta el riel superior, y luego Saque la parte inferior hacia ti. Si es pesado, usa un ventosa o pedir ayuda.
5. Corte la masilla (si es necesario)

Utilice un cuchillo multiusos o removedor de sellador alrededor del panel fijo o moldura si está sellado.
6. Retire el panel fijo
Busque tornillos o sujetadores a lo largo del marco. Use un perforar Para quitarlos, haga palanca suavemente con un espátula o palanca. Retire lentamente el panel del riel.
7. Limpie e inspeccione el marco
Una vez que ambos paneles estén afuera, tómate un momento para aspirar las vías y comprobar si hay desgaste, daños o problemas de alineación. superficies limpias con agua y jabón suave.
8. Asegure la apertura (si es necesario)

Si no va a reemplazar la puerta de inmediato, Cubra la abertura con madera contrachapada o una barrera para seguridad y aislamiento.
Preguntas frecuentes
1. ¿Cuánto tiempo tarda?
Generalmente alrededor 1 a 2 horas, dependiendo del tipo de puerta y de cuántas piezas (como el marco o el panel fijo) se necesiten quitar.
2. ¿Qué hacer con los paneles de vidrio viejos?
Si el cristal está intacto, donar o reciclar De lo contrario, consulte con su centro de reciclaje local o un contratista para su eliminación segura.